The core principle of Touch Portal is to have Pages on your mobile device with controls that allow you to control your desktop. We will explain how to use this section of Touch Portal

We will explain each number in the image above to give you a good understanding of this section.
With this control you can manage your pages. You can select a page from the dropdown selector to change the page you are editing.
Touch Portal supports Folders for pages. The dropdown will show a tree of your own structure. Click on the "+" button to add a folder of a page.
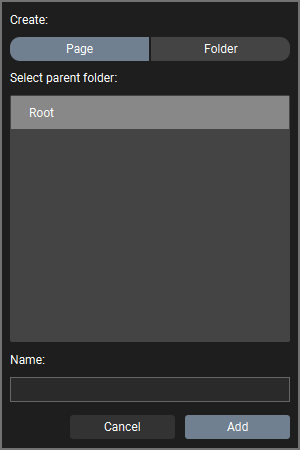
You can first select what you want to create, a Page or a Folder. The second tree will show the Folder structure you currently have (in this example on the root is available). If you do not select a Folder in this tree view you will automatically select the root Folder. The third part is to give the Folder or the Page a name. Once you have create a Page, Touch Portal will automatically display that page to the user.
Next to the "+" button you have the trashcan button which will delete the current page in the selector dropdown box. Before doing so it will always ask for confirmation.
When you press the cog button you will see a popup menu with several options:
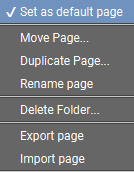
If you want your current Page to be the default page that Touch Portal starts on select the top option. This will ensure that whenever Touch Portal starts for the first time, it will open that Page instead of the (main) Page.
You can also move your page to a different Folder. Select this option and you will see a popup where you can select the new destination folder.
Renaming the page and duplicating the page both work the same. You will get a popup message asking for a new name. Duplication will make a copy of that page with the new given name. Renaming will just rename the current page.
Deleting a Folder can only be done when there are no Pages or Folders inside of a Folder anymore. Selecting this option will show a popup where you can select a Folder which you want to remove.
You can also export your pages or import pages from others. If you have a nice page, remember that you can submit it on our website to share it with the rest of the Touch Portal community.
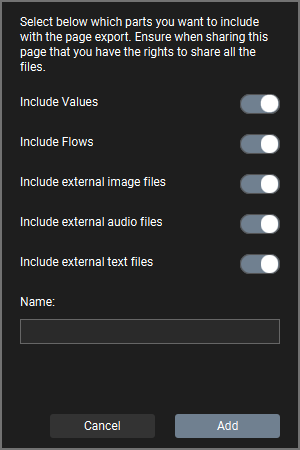
When you export your page Touch Portal will ask you to select what should all be in that. A Page can have dependencies on Values for example and maybe on other elements as well. With this you can decide whether or not you want those elements included. The same goes for when you import a Page. You may not want the Values for example because you already have them. Touch Portal allows you to do this.
This button allows you to have your page below with the given orientation and aspect ratio. The options available will be a representation of your connected devices.
Touch Portal provides you with several options for your Pages. We will explain them briefly.
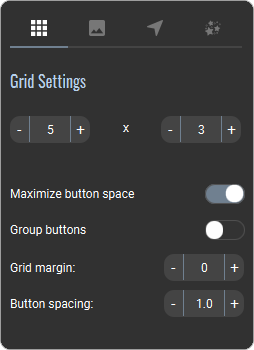
Each Page can have up to 110 buttons. You can achieve this by giving the page 11 columns and 10 rows. The maximum of columns or rows is 15. This means that, due to the limitation of buttons the other part can be a maximum of 7.
You can also select on how the grid should be displayed. Below is an image that shows you the different ways of displaying the grid

The default method (Normal) is that all buttons are displayed as square buttons where Touch Portal tries to display them as the biggest sqaure in the available space. The Grid is stretched from left to right.
To make the most of all available space on your page you can select to use that space. This will stretch your buttons to fill in the maximum available space for a button. Please note that images will be rendered still as square icons.
If you like the buttons to be square but you do not like the space between the buttons you can group them (Group Buttons). This will group the buttons centered on the device.
On top of this you can specify the minimal space between buttons or add some additional margin to your grid, making the grid smaller.
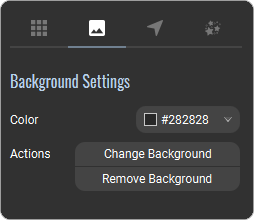
Each page starts with the default color. When you have the Pro Upgrade you can specify the color or you can select an image to be displayed as the background.
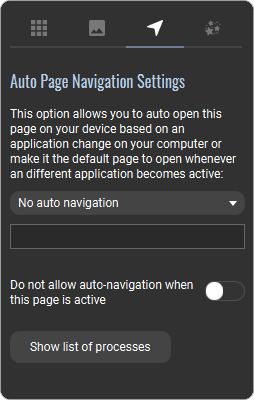
Touch Portal allows Pages to be loaded on your device when a specific desktop application or a window with a specific title becomes active.
The dropdown has a few options:
As a special option, Touch Portal provides you a way to force a Page to not change due to this automated system. If you select this option, the only way you can navigate to a different Page when you are on this Page is by using the Go-To-Page action in a button.
We have added a window showing all the currently running applications and titles to help you create intelligent auto navigation setups. The button "Show list of processes" will open this window.
Touch Portal comes with Graphics Upgrades. If you have them enabled, you can set the options for the current Page with these settings.

To learn more about the available graphics upgrade check out our overview.
This part shows you the grid of buttons of your selected Page. When you click on a button or an empty place with your left mouse button you will be able to edit a button on that position. More on this in our guide Create your first button. If you click on the button with a right mouse button you will get an popup with several options you can do with or on that button.
You can drag and drop buttons to different location and the device that is shown has the same scaled dimensions as the button field on your last connected device. When you connect a different device this field will redraw and show you the same ratio as your new connected device.